HTML Form Manipulation
SubjectThis tutorial illustrates how the Whitebeam 'forms' library can help you write and manage complex form interactions in web browsers. The library primarily consists of a set of XML tags that allow web-designers to define and manipulate the forms they design. The following topics are covered:
OverviewThe Whitebeam Form library simplifies the development of user interaction with websites through HTML forms. The aim is not to do something that cannot be done using the raw server-side and client-side capabilities of the environment, but rather to apply a set of abstractions to simplify the implementation and speed development. The model encapsulates a set of form fragments and command handlers in a single 'Presentation Page' (file). A simple example should illustrate the capabilities. Consider a simple form sequence that does the following:
In a traditional web design the forms would be designed in one page - possibly static. A 'submit' button would direct the data to a server side programme - such as a CGI programme. That page would apply the changes then go back to the main page. This can be very clumsy. Take a simple sequence:
Traditionally you'd implement the initial list, the confirm box and the delete action in separate files. Most server side processing environments, including Whitebeam, would allow you to keep all three elements in a single file. This con be complex and at times confusing. The Whitebeam form library takes this common behaviour and makes it much simpler by defining a set of XML tags to encapsulate and abstract away the complexity. DependenciesThe Whitebeam form library is implemented in a single file 'form.inc'. This file contains all the JavaScript and tag implementations to support the form abstraction. To use this mechanism in a file - simply include it at the start of your file using:
<rb:include src="form" system="yes"/>
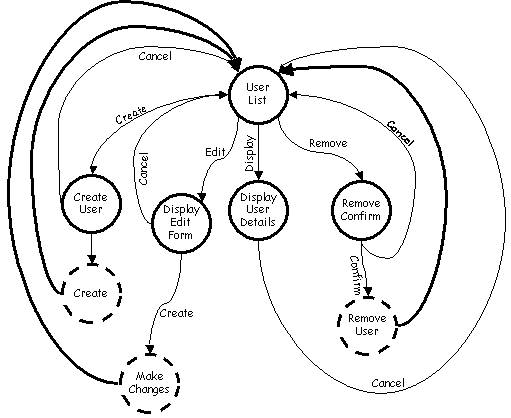
Formal DefinitionsFormal definitions for the tags described in this tutorial can be found here. DesignIf you are following the Whitebeam recommended web design practices you will already be familiar with this step. Forms and user interraction can be complex - and while it is possible to implement a complex interraction by trial and error it is much easier if the system is properly designed up front. As an example we're going to build on the proposal in the previous section. First of all some basics. Each user interraction is going to be broken into a number of 'commands'. Each command is either the result of a user pressing a 'submit' button or clicking on a hotlink within the displayed page. We're going to use the design notation to describe parts of the user interaction, and each of the 'bubbles' represents a page as seen by the user - not necessarily a separate Whitebeam presentation page. In fact you'll see that most of the client pages are implemented as a single Presentation Page (file). The following diagram illustrates the interraction we are going to implement:
In this diagram there are 8 logical 'pages' - but remember those with 'dotted' lines are transient - they perform some action such as creating a member - then immediately move on to another page. The initial page displayed to the browser is the 'Member List' - this is the entry point for the sequence. The Whitebeam form library encapsulates this entire sequence in a single presentation page. Each of the 'pages' is represented as a 'command'. The set of commands that make up this sequence are called the 'formset'. Each command has a name - these have to be unique within the formset. The entry command to the formset has the name 'default'. The formset and the commands are represented within the file using XML tags as follows:
In this example skeleton we have a formset with three actions - no implementation yet! This would generally be the first stage of generating the form handler after the diagram above. That is - take the diagram and create a formset with command tags for each identified command. The form library decides which command to load by looking for a form parameter with a name stating with 'rbcmd-'. For example 'rbcmd-create'. 'rbcmd-' will be stripped from the front of this leaving a string, in this example 'create'. The form library looks for a command handler with this name. If there are no parameters with the 'rbcmd-' prefix, or the resulting command cannot be loaded, the library will attempt to load the command called 'default'. Form DataIf you include 'form.inc' in your application we can be pretty sure you are going to want to use form data of some kind. To simplify the use of this - the form library itself extracts the form data and stores it in a special global variable called rb$params. This means that if you want to check for a specific parameter, for example 'username', then you just have to look at rb$params.username, rather than have to call rb.page.formdata(). Processing Command HandlersThe library will execute the selected command handler. Execution comprises the following steps.
Command TestThere is often a pre-condition that must be tested before a command can be executed. Take our membership example above. In this case, in order for the 'view member' command to be correctly executed, the user must have selected a user on the default page. These tests can be performed manually within the body of the command, most commonly using an <rb:test...> tag. This does bloat the code though - and makes the resulting page more complex to understand. The form library 'test' facility is a good alternative if the test is fairly straightforward. The test facility uses 3 XML attributes on the <rbm:command...> tag:
This seems simple - but can make for very easy form error checking that can cover a multitude of error recovery situations. Again - take the membership example. In this example, all the commands except create need to have the identification of the member on which to operate (who are we going to edit/view/delete?). We decide we're always going to pass this through as a parameter called 'memberid'. If the member is not specified then we simply want to go back to the member list - but also display an error message telling the user to first select a member. With the Whitebeam form library this is very easy. Remember from the previous section the form data is already stored in a global variable, rb$params. To check for the 'memberid' parameter we simply write our rbm:command tag as follows: <rbm:command test="rb$params.memberid!=null" error="default" msg="First select a member"> [body - skipped if the test fails.]... </rbm:command> If the test fails the body of the command is not executed, instead the default command is executed and the rb$message JavaScript variable is set to contain an error message. More complex tests can be performed by defining a validation function and calling that from the 'test' expression - having the function return 'false' of validation fails. Command SequencesAs previously described the form library will select a command handler basic on the 'rbcmd-' parameters passed from the client. Some of these command will display information on the browser and wait for the user to take some action - a user event. Other commands thought may take some internal action - consider the command we execute when the user has entered new member information and pressed the 'OK' button. The handler must take the form information presented - validate that information then either@
Obviously the 'create' handler could do all this, but the member list is already handled by the 'default' command and the form is already presented by the 'createUser' command. These need to be reused to avoid duplication. In effect the create code wants to redirect execution to another command. Ideally the create command will look like:
Note that this is not intended to be complete - the parameters and the creation result should check to make sure it happend. You can however see that one command handler passes control to another simply by setting the value of rb$command before returning. In this way an entire sequence of handlers can be executed. Note that setting thiw propertry Notes
Displaying and Manipulating the FormsSome of the commands in the form set will want to display real HTML forms - showing data and allowing input from the user. These forms can be implemented in exactly the same way as standard HTML forms - using HTML tags. The Whitebeam Form Library on the other hand provides some facilities to make this a lot simpler. This additional behaviour is provided by enhancing the standard form tags using server-side processing before they reach the clients browser. The following sections describe the facilities available. Initialising Form FieldsThe following HTML creates a very simple form containing two text elements:
This form displays three edit boxes along with two buttons. This basic skeleton could be used both for a 'create member' and a 'edit member' type form. However - in the latter, it would have to be modified to contain the existing values. This is achieved in HTML using the 'value' attribute to the input tag. So to create both forms there would usually be two instances of this HTML in the file: one for the create form and a more complex for the edit form. The edit form would be required to load its data from some dynamic JavaScript variable containing the members information, something like:
This becomes cumbersome, especially if you consider the case where some (or all) fields may not be present. To simplify this process the forms library allows you to specify a data source before creating the form. The library then searches this JavaScript object for values matching the field name. If found the library automatically create a value clause for that item. To use this facility you must take the following steps:
So the simplification of the form above is as follows:
Which coincidentally is the same as the format for an empty form - so including the form in an rb:block tag and using it in both places becomes possible. For the create form, set rb$data to null before including the block. Highlighting Errors in Form EntryWe can now fairly simply generate a form preloaded with data and accept the submit of that data back into the browser via the command model. The first thing the submit handler does is to validate the information entered by the user. There remains the problem of what to do if the validataion fails - for example because the name contains illegal characters. Ideally we would display the form again, this time with an error message and with the incorrect field highlighted. The form library supports the marking of individual fields in a form as it is constructed. It does this by looking at a JavaScript variable called rb$errors for a property name matching the field name. If it is present and the value is 'true' then this field is considered in need of highlighting and the library will show the item with a different background colour. By default this is a light blue, but the colour can be changed to storing the appropriate string in rb$errorColour. At the moment the colour of the text in a highlighted field is not modified so choose a highlighting colour appropriate to the text colour! Static DisplayIt is sometimes useful to be able to display a form as static text - i.e. use the same fields as a defined form - but simply display the values rather than include edit boxes. The standard method would be to use separate HTML along with server-side rb:evals to display the static data. Instead - if a form has been defined that contains the necessary definitions, then the form library allows the form to be display as 'static' (i.e. not a form) data. To do this simply set the rb$static JavaScript variable to 'true' before displaying the form. ExampleThis example combines all the elements described above to implement a user create/edit/view system. Note that in this example the code for the default command has been omitted, as have several command handlers.
Download form libraryThe form library in encapsulated in a single library file that you include in your Presentation Pages as follows : (change the path if you store the file elsewhere!) |