
| Site Map | |
| Home | |
| Application Guide | |
| Reference | |
| Community | |
| Contact Whitebeam | |
| To-Do | |
| Download | |
| Credits | |
| Licence | |
| Whitebeam Users | |
 |
|
Membership Services Application
Membership Services Applicationoverview Statement of Requirement Components structure diagram files details OverviewThis example application aims to demonstrate Membership services. Here, members register to a web site then gain access to a number of facilities (such as a bulletin board) depending upon their interests. Of the many Redbourne features used here, of particular note is the use of the Application Interface Functions 'Member', 'Interests', 'forms', 'extended authentication', Web page look and feel, 'Message Groups' and 'Questionnaires'. To find further information regarding the usage of any application interfaces mentioned in this document please refer to the tutorials section of the redbourne web site or click here. This document provides you with the application's statement of requirement, a site structure diagram, the files used and finally a full description of each file's code. All the files can be downloaded in one zip file and uploaded to your website. To gain full access to the site, the default usernames and passwords are auto generated by the application's index page:
Application Statement of RequirementA new company called the Red Page Community (RPC) wants to create an on-line skills bank web site. RPC's web site will allow any individual or company to register and become a member. On registration, a member's details will be left for public viewing. The general public will be allowed to search through the skills bank details from the RPC's home page. The skills bank site will be split into a number of categories or interest groups. Registered members will be associated with one or more (max 3) of these interest groups. It is intended that some interest groups will be exclusive. Members register by filling out a questionnaire. This questionnaire will be used to cumulate personal details. When a member joins an interest group, they will gain access to that group's bulletin board. Registered members may also upload one small file. This document could contain supplemental information such as a CV or a company location map. Once registered, upon logging on to the main site, a member or administrator will obtain access to additional site features (see below). The web site administrator will manage member details, the range of interest groups available, the site questionnaire and the bulletin boards. Membership to the site will remain free for the near future, as RPC wants to attract as much interest as possible. RPC intends to create income through advertising and selling of details provided from the membership questionnaire. The administrator can peruse, collate and downloaded into comma-separated files answers generated from the web site questionnaire. The administrator will be responsible for creating new interest groups when required. Special interest organisations will be able to apply for exclusive interest groups; the administrator will vet such applications. Finally, the administrator will have full access to all parts of the web site to monitor details and activity. ComponentsThe following components will be created to support RPC's application.
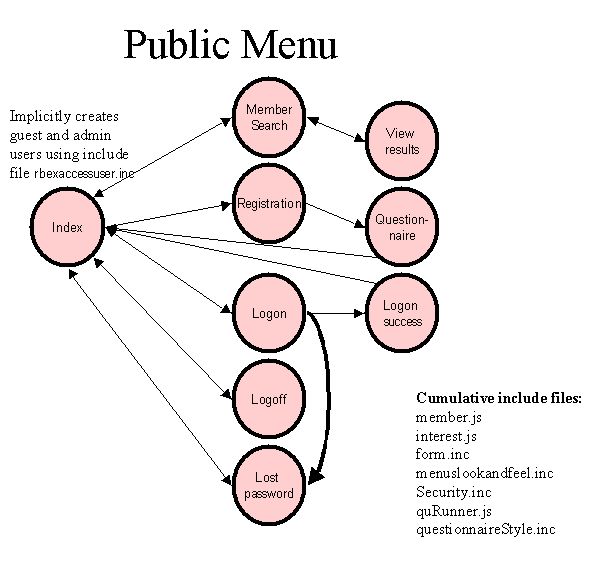
Structure Diagram
Files |
||||||||||||||||||||||||||||||||||||||||||||||||||||||||||||||||||||||||||||||||||||||||
Application | |
|---|---|
| 1 index.rhtm | Entry point to the application. |
| 2 membersearch.rhtm | Provides a facility for the general public to search for members on the website. |
| 3 publicmemb.rhtm | Provides a facility for displaying a member's details to the general public. |
| 4 registration.rhtm | Provides a facility for the general public to register as a members. |
| 5 login.rhtm | Logon page for site members. |
| 6 logonsuccess.rhtm | Log on success page which provides a simple one-line feedback. |
| 7 logout.rhtm | Logout page for site members. |
| 8 lostpassword.rhtm | Emails a new password to a member who has lost their password. |
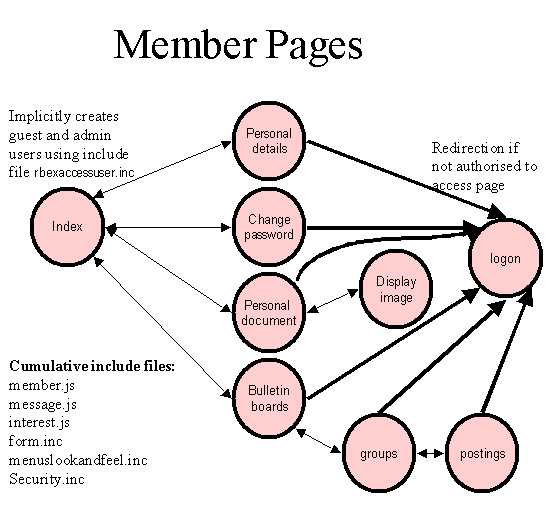
| 9 usermemb.rhtm | Allows a member to manage their personal details. |
| 10 changepassword.rhtm | Allows a member to change their password. |
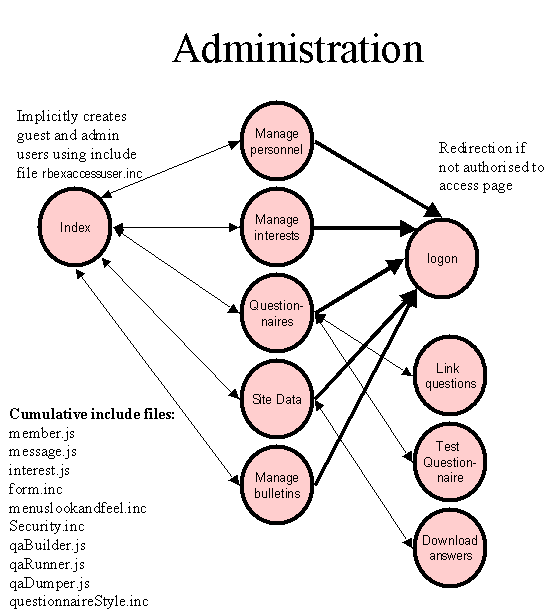
| 11 membadmin.rhtm | Allows an administrator to manage all member details. |
| 12 intadmin.rhtm | Allows an administrator to manage all interest details. |
| 13 member.js | JavaScript code supporting the concept of a Member object. |
| 14 interest.js | JavaScript code supporting the concept of a Interest object. |
| 15 rbpagemenu.inc | JavaScript and Redbourne code supporting menu macro tags. |
| 16 extauth.inc | JavaScript and Redbourne code supporting login/logout macro tags. |
| 17 menuslookandfeel.inc | Simple include file which can be modified to alter the look, feel and menu structure of the site. |
| 18 form.inc | JavaScript and Redbourne code supporting form macro tags. |
| 19 rbexaccessuser.inc | This file will make the index page automatically check for the existence of the default admin and guest users. If they do not exist then they will be created. This supports the application so that the files above can be exported onto a clients site without database modifications. It must be removed once a community structure has been developed on the client's web site. |
| 20 security.inc | Includes the extended authentication file (16) and first sets up the global variables supporting community access to the site. |
| 21 documents.rhtm | Allows a user to upload a file and save the fileID into the Members customData area. |
| 22 image.rhtm | Used to display a file on a web page originating from the database. |
| 23 newsadmin.rhtm | Used allow management of bulletin boards. |
| 24 groups.rhtm | Used display bulletin board postings. |
| 25 post.rhtm | Used allow support postings and replies for bulletin board postings. |
| 26 bulletins.rhtm | Used to list all available bulletin boards for members. |
| 27 createQuestionnaire.rhtm | Used to manage all questionnaires for the site. |
| 28 testQuestionnaire.rhtm | Used to display, view only, the whole set of questions for a questionnaire. |
| 29 regQuestionnaire.rhtm | Used to run the questionniare for a new member. |
| 30 manageAnswers.rhtm | Used to mange all answers obtained from the questionnaires. |
| 31 dlAnswers.rhtm | Used to download a set of answers in XML or CVS format for a given questionnaire. |
| 32 qaBuilder.js | Include file supporting the functions which create a questionnaire. |
| 33 qaRunner.js | Include file supporting the functions which run the questionnaire. |
| 34 qaDumper.js | Include file supporting the functions which download questionnaire answers. |
| 35 linkQuestions.rhtm | Used to allow questions to be linked to other questions - self contained wizard requiring only a fileID (questionnaire ID) to start. |
Detailed Explanation of Application
Introduction
This application has been specially created to demonstrate Redbourne's support for different membership services. Here, each action has been encapsulated into a simple menu item e.g. logon, register etc. Each of the activities will now be described in detail.Site Security
Dependances
Web page files: All Pages
Include files: security.inc, extauth.inc
Detailed Description
To support this application, access to every page needs to be controlled. Each page (with the exception of the public pages) is 'tagged' depending upon who can view it: members or administrator. This has been achieved by using the Redbourne logon macro tags supported by the include file extauth.inc. For this application, two communities of people have been created: user and useradmin. This has been achieved by including the file rbexaccessuser.inc in the index.rhtm page. Each web page is given the name of the community(ies) of people allowed to access it - the macro tags will then carry out the hard validation work.
The code supporting web page access wraps around the whole web page and looks like:
<rb:include src="security.inc"/>
<rbm:extauth community="useradmin" authfail="login.rhtm">
<html>
**WEB PAGE CODE GOES HERE**
</html>
</rbm:extauth>
This code first includes the library file security.inc which in-turn includes the extauth.inc file. The security.inc file holds the global variables defining the user and administration communities. Next, the macro tag rbm:extauth takes a parameter which defines the community(ies) which have access to that web page and also a parameter defining the page to be called if validation fails. The web page source code comes next followed by a rbm:extauth closing tag. By including the method call mandatory=no we could have allowed access to the web page but programmatically restricted the output by the reference to the extauth macro tag variables such as extauth.sessionUser.
Web Page Menu, Look and Feel
Dependances
Web page files: All Pages
Include files: menulookandfeel.inc
Detailed Description
This file supports the idea that all web pages should have the same look and feel. Here, the menu generated, banner and any global variable preferences such as the company's email address are set. This file is then included by every web page. Simply changing this one file can quickly disseminate global changes. Also, this file dynamically maintains the menu structure. Here, the entire structure is defined and protected by Redbourne logon macro tags.
<rbm:extauth community=user,useradmin" authfail="ignore">
<rbm:menuitem parent = "home">
<rbm:menuitem name = "Personal Details" href="usermemb.rhtm" key="userDetails"/>
<rbm:menuitem name = "Change Password" href="changepassword.rhtm" key="changepassword"/>
<rbm:menuitem name = "Personal Document" href="#" key="userDocument"/>
<rbm:menuitem name = "Bulletin Boards" href="#" key="userBulletins"/>
</rbm:menuitem>
</rbm:extauth>
The code above represents the menu structure for a logged on member. The additional facilities such as personal details are attached to the parent 'home'. These items will only be displayed however, if the community of the logged on user is 'user' or 'useradmin'. You will notice that the value for authfail is set to 'ignore'. This means that no code whatsoever should be displayed between the tags on failure of authentication and importantly no redirection should take place. The true source code makes reference to variables userCommunity and adminCommunity 'globalised' by the security.inc file.
Member Search.
Dependances
Web page files: membersearch.rhtm, publicmemb.rhtm
Include files: member.js, interest.js, form.inc, rbpagemenu.inc, menuslookandfeel.inc
Detailed Description
This page provides a member search facility. There are three ways a member can be search for: by name, by keyword and by interest group. The first two ways have been incorporated into one source code area (activity) called namesearch and the last way, the interest group search, is supported by another activity called intsearch. Each activity is triggered by parameters provided by the previous webpage. For the purpose of this application, this web page simply recalls itself again and again to support a new search.
The namesearch functionality is supported by the code:
var flags = new Object;
if (rb$params.searchname != null)
    flags.searchname = true;
if (rb$params.searchdescription != null)
    flags.searchDescription = true;
var keys;
if (rb$params.text)
    keys = [rb$params.text];
else
    keys = [];
var iterator = Member.get(keys,flags);
displaySearchResults(iterator);
The value for rb$params is set at the top of the page and corresponds to an object holding all the parameters passed across when the web page call was made. Having checked what area the user wanted to search (the name or keyword area), the appropriate flags were set. The keyword to be searched on was then set (again passed across in rb$params) - in this case there is only one keyword. There could have been any number of keywords, hence the need to put it into an array. Finally, the call to the database is made and the results put into a Redbourne iterator variable. The results are then displayed on the screen by use of the function displaySearchResults().
The intSearch functionality is supported by the code:
// Extract from the top of the page.
var lookFor      = new Array;
var lookForAssoc = new Array;
var id;
if (rb$params.interest!=null) {
  if (typeof (rb$params.interest) != "object") {
  id = parseFloat(rb$params.interest);
  lookFor.push(id);
  lookForAssoc[id] = true;
  }
else {
  for (var i=0;i< rb$params.interest.length ;i++){
    id = parseFloat(rb$params.interest[i]);
    lookFor.push(id);
    lookForAssoc[id] = true;
   }
 }
}
// Extract from the source code body
var iterator = Interest.findMembers(lookFor);
displaySearchResults(iterator);
The call Interest.findMembers() takes one parameter which was provided by code processed at the top of the web page. This code creates an array depending upon the type of parameters passed by the prior web page. It is slightly complex as it has to potentially managed more than one interest. The findMembers() method returns an iterator which is then used to display the results on the screen.
All the displayed results are hypertext links to a second web page called 'publicmemb.rhtm'. This form is actually a sub-set of the 'membadmin.rhtm' file and souly uses the view activity. For more information regarding this activity please refer to the documentation for the 'membadmin.rhtm'(Member management) file below.
Registration
Dependencies
Web page files: registration.rhtm, regQuestionnaire
Include files: member.js, interest.js, form.inc, rbpagemenu.inc, menuslookandfeel.inc, quRunner.js, questionnaireStyle.inc
Detailed Description
This page allows the general public to auto-register with the web site. Initially a form is presented requiring a number of mandatory fields to be filled. Once the register button is pressed, a new member is created using these new details. On success of creating the new member, the web page automatically logs the member on and supplies a link to the 'Questionnaire' web page. The questionnaire webpage will find the sites questionnaire by interogating the admin user's customData. The questionnaire will then be 'run' and the reference to the saved answers located in the new members customData.
Like for most of the web pages on this site, the each activity (member creation and the questionnaire) is supported by a web page which calls itself again and again depending upon what action is required. By use of macro tags supported by the forms.inc file, each one of these activities can be defined and displayed according to the web page's calling parameters. The registration.rhtm file is a sub-set of the 'membadmin.rhtm' file and uses the create and do-create activities. For more information regarding member management please refer to the documentation for the 'membadmin.rhtm'(Member management) file.
One feature used during the registration process of particular note was the auto-logon feature. This feature is supported by the "extauth.inc" file. The command line used to carry out the auto-logon activity is as follows:
<rbm:extlogin rb:eval="user#rb$params.uName" rb:eval1="password#rb$params.pwd"
		 rb:eval2="community#userCommunity" authok="ignore"/>
</rb:script>
Alternatively, the following JavaScript call could have been used instead:
<rb:script>
extlogin(rb$params.uName,rb$params.pwd,userCommunity);
</rb:script>
The regQuestionnaire file orientates around the following main call:
var qr = new qaRunner(questionFileID, membAnswerFileID)
qr.displayPage(currPage,"get", "regQuestionnaire.rhtm");
The values for questionFileID and membAnswerFileID are stored against the current member at the end of each iteration and called back for the new qaRunner call at the start of each iteration. The currPage value is again maintained by the application which increments and decrements the page number according to the prior web pages button triggers.
Member Logon
Dependances
Web page files: login.rhtm, logonsuccess.rhtm
Include files: rbpagemenu.inc, menuslookandfeel.inc
Detailed Description
The purpose of this page is to provide a simple logon screen. Two text boxes are provided for the username and password and a submit button to confirm the requirement to logon. The Redbourne logon macros held in the extauth.inc library support this entire page. All that is required is the passing of parameters 'sessionUser' and 'sessionPass' to a 'logon style' web page wrapped by the tags:
<rb:include src="security.inc"/>
<rbm:extlogin rb:eval="community#userCommunity" authok="logonsuccess.rhtm">
<HTML>
**WEB PAGE CODE GOES HERE**
</HTML>
</rbm:extlogin>
Here, the web page content will be displayed on a failed logon or on the first time around. The content will then be expected to post the username and password to itself again for authentication. The community(ies) against which the username is validated are listed on the rbm:extlogin command line. On success the user will be redirected to the web page stipulated by the authok parameter. If you would prefer, instead of a continuous logon fail loop, the web page content could provide a hypertext link away from this activity e.g. lost password.rhtm.
Member Logout
Dependances
Web page files: logout.rhtm
Include files: security.inc
Detailed Description
This web page will delete the users logged on session. This is required as logon information is cached on the browser and redbourne system. If a logged on session is not deleted (logged off) then it will remain current for 30 minutes and then be automatically deleted by the Redbourne system. The tag which carries out this logout is:
<rbm:extlogout/>
Lost Password
Dependances
Web page files: lostPassword.rhtm
Include files:rbpagemenu.inc, menuslookandfeel.inc
Detailed Description
The purpose of this page is to allow a user to get a new password if they have forgotten their old one. The way in which this is managed is by asking for the user's unique username. This username will then be checked against the database. If the username exists then a new username password will be generated and emailed to that username's email address. If the username cannot be found then further options to re-register or try again will be displayed.
The variables 'invalidName' and 'confirmed' are used throughout this code. On startup, they are set so that the main default form is displayed asking for the username. If the username cannot be identified then 'invalidName' will be set so to bring up a different page and options. If the username does exist then the 'confirmed' variable will be set so that a new password can be generated, emailed to the user and a final confirmation message displayed.
Change Password
Dependances
Web page files: changePassword.rhtm
Include files:rbpagemenu.inc, menuslookandfeel.inc
Detailed Description
The structure for this web page is very similar to that of the lost password web page. The purpose of this page is to allow a user to change their password upon the provision of a successful logon username/password combination and a new password. The username and password is checked against the database. If authenticated then the new password will be used to replace the current one and then emailed to that username's email address. If the username cannot be found then the same input screen as at the start will be displayed. There is very little to add to that already written for the lost password web page. The two main differences are that a username/password authentication is carried out: rb.contact.validate(parameters.name, parameters.password, parameters.name) and the password is not auto-generated.
Personal Details
Dependances
Web page files: usermemb.rhtm
Include files: member.js, interest.js, form.inc, rbpagemenu.inc, menuslookandfeel.inc
Detailed Description
The purpose of this web page is to allow a user to edit their personal details, including interest groups. This form is a sub-set of the 'membadmin.rhtm' file and uses the edit and interest activities. For more information regarding these activities please refer to the documentation for the 'membadmin.rhtm'(Member management) file below. This web page by default displays the edit activity first. It is important to constrain this web page so that only the user's information can ever be displayed and modified. This has been achieved by using the following code positioned at the start of each iteration of this page:
- membersDetails.uName = extauth.sessionUser; // originates from the logon macro tags
- var aMember= new Member(membersDetails);
The remainder of the changes to this subset of the 'membadmin.rhtm' form surround navigation between activities. Here, the enter edits screen and do edit button iterate between each other, the list interests and change interests activities also iterate between each other, and finally there are navigation 'jump' buttons between the two activities.
Personal Document Management
Dependances
Web page files: documents.rhtm, image.rhtm
Include files: member.js, rbpagemenu.inc, menuslookandfeel.inc
Detailed Description
The purpose of this page is to allow a user or administrator to upload and maintain a small document. This would possibly be an image but could also be any other format supported by the computer. This form is in four parts. The first part determines what users file to bring back depending upon the calling parameters. The second part carries out the prior web pages request. The third part reloads the new/modified file which is used by the fourth part in the main display. If a basic user is using the form then the details brought back will be only the users. If an administrator is using the form then an extra option to find a users details will be displayed. By default or on the submission of a bad user by the administrator, the logged on user name will be used.
An important part of the script decides how and in what way the image is to be displayed. A gif or jpg will only be diaplayed, otherwise, a link to the image will be displayed and the browser will decide how it will be displayed. To display and image, the file image.rhtm is used. This is described in the redbourn documentation here. The code supporting this is as follows:
<rb:script>
	if (imageExists &&
		(aFile.fileDef.mime() == "image/pjpeg" ||
  		aFile.fileDef.mime() == "image/jpeg" ||
		aFile.fileDef.mime() == "image/gif")){
		rb.page.write('<IMG SRC="image.rhtm/'+aFile.fileID+'">');
	}else if(imageExists){
		rb.page.write('<a href="image.rhtm/'+
			aFile.fileID+'">Click to view file</a>');
	}
</rb:script>
Bulletin Boards
Dependances
Web page files: bulletins.rhtm, group.rhtm, post.rhtm
Include files: member.js, message.js, interest.js, form.inc, rbpagemenu.inc, menuslookandfeel.inc
Detailed Description
The aim of this menu item is to allow members to access the bulletin boards allocated to their interest groups. The first web page (bulletin.rhtm) is designed to look at all the interests of the member and list them alongside links to the appropriate bulletin board (if one exists). This link will be to the group.rhtm page that requires at least the unique name of the appropriate group to be viewed. To stop the member typing in the URL with an unauthorised group, this web page double checks the members interests before allowing access to the bulletin board information. The file named post.rhtm is used to allow the member to create new postings or replies to a bulletin board. The main bulletin board web page (group.rhtm) will allow the a member of the administration community to access all boards. When the postings are listed, an image of a cross will be displayed next to the entry if that entry can be deleted. A posting can only be deleted by the person who has submitted the entry or by an administrator.
Personnel - Member Management
Dependances
Web page files: membadmin.rhtm
Include files: member.js, message.js, interest.js, form.inc, rbpagemenu.inc, menuslookandfeel.inc
Detailed Description
The purpose of this web page is to allow an administrator to list all members on the website and to manage their details where necessary. This web page is a super-set of many of the web pages on this site and also supports the ability to remove members.
This page starts by providing a list of all members using the code:
var iterator = Member.get();
The remainder of the activities are driven from buttons at the bottom of the listing: view, edit, create or remove.
Items
There are 2 items common to all activities. The first is the auto-generation of a member object from parameters sent by the prior web page. This object is named aMember and as you will soon see, it is referred to by almost all activities except when creating a new member. The second common item is a function called memberForm. This function takes the aMember object and a display_type indicator and outputs fields on the web page depending upon the context of the call. The value for the display_type must be either true for a static display or false for input text boxes. An example would be when the administrator wants to view a Member's details. The member list will have been automatically generated, a member will be selected and the view button pressed. This will post the web page back to itself, with the member's member.ID and view form request as calling parameters. The aMember object will be generated automatically at the start of the page from the member.ID and then used by the view activity in a memberForm(aMember,true) call.
Creatememb - Create Member
This activity will create a new member by use of the class method Member.create(). Before carrying out this activity, a check is made for the mandatory fields. If any fields are empty, then the fields will be marked, a message displayed and a redirection made back to the calling activity:
if (rb$params.uName==null || rb$params.pwd==null ||
    rb$params.pwd=='' || aMember.uName=='' ||
    rb$params.email=='' || aMember.email==null) {
    if (rb$params.uName==null || aMember.uName=='') rb$errors.uName = true;
    if (rb$params.pwd==null || rb$params.pwd=='') rb$errors.pwd = true;
    if (rb$params.email==null || rb$params.email=='') rb$errors.email = true;
    if (rb$params.surname==null || rb$params.surname=='') rb$errors.surname = true;
    rb$message = "Please enter mandatory fields"; // message for the display
    rb$command = 'default'; // redirect to the last calling activity
    rb$data = aMember; //send the current form parameters for screen display
}
Notice how this activity takes advantage of the aMember variable. It has been setup, but not created on the database, from the parameters sent by the prior web page. Once the member has been created on the database, the password and community are set. Finally, the activity displays the new member's details by immediatley redirecting to the view activity.
if (aMember.create()<0) {
  rb$message = "That username is already in use please enter a different one.";
  rb$command = "default";
}
else {
  rb.contact.setPassword(aMember.ID, rb$params.pwd);	// Set the password
  var userCommunityDetails = rb.contact.communityInfo(-1,userCommunity);
  ..
  ..
  rb$message='Member Created';
  rb$command='view';//immediately redirect to the view activity
}
View View Members' Details
This activity displays the member's details and offers the opportunity to edit any information. To this end, this view page is very similar to the create or edit activities - a similar set of attributes or fields needs to be displayed. Having displayed the new member's details, the member's interests need to be listed. This done by calling var ints = aMember.getInterests(); which returns an iterator used to create the interest list. Buttons are then made available which allow the user to modify personal details or interests - each one of these buttons redirects to a different activity.
Interests Display Members' Interests
The purpose of this activity is to display the member's interests and present two choices, either return to the main view activity or to change the interests. The code used to find all the available interests is the same as for the view screen: var ints = aMember.getInterests();. The buttons presented after the list will call activities 'view' or 'changeints'.
Changeints Change the Members Interests
This activity will list all the interests available and then check the ones which the member already has access to. This is carried out by
- 1. Finding all the interests on the system.
- 2. Finding all the members interests.
- 3. Comparing if any match and marking the checkbox as checked if any matches are found.
Do_changeints Modify the Members' Interests
This activity actually changes the member's associations with interest groups on the database; this is carried out by using the methology above. Here, all the interests are returned from the database. If any match the ones passed to the activity by the prior web page then the member is linked to that interest. If any database interests are already linked to the member but have not been provided in the list passed by the prior web page then that will mean that the interest is no longer required. The code supporting this uses the method calls aMember.remInterest() and aMember.addInterest().
Edit Edit members' details
This activity displays the member's details using the displayForm function. This call uses the display parameter 'false' to indicate that the display fields are to be text boxes. Any changes required can then be made by the user who then presses the 'do edit' or 'cancel' buttons. The 'do edit' button will call activity 'do-edit'
Do edit Save the Member's Changes on the Database
This activity utilizes the fact that the aMember object is created at the start of this page. In this case the aMember object will be one returned from the database having the ID of the one to be modified. The modifications are also added in the new Member creation by including the prior web page's changed parameters in the new Member call. This is the Member object's default behaviour. This modified variable aMember is then saved on the database using the method call aMember.save(). Success of saving on the database will result in a redirection to the view page. Failure results in redirection back to the edit activity.
Remove and do-remove
The code supporting the remove activity is the Member object's method: Member.remove(). The member which the administrator wants to delete has already been pulled back from the database by code at the start of this web page (the aMember variable was automatically generated by use of an ID passed by the prior web page). It is this aMember variable which is used in the remove command. This command will permanently delete the member from the database. Once removed, the activity immediately calls the main default activity listing the remaining members.
Interests
Dependances
Web page files: intadmin.rhtm
Include files: member.js, message.js, interest.js, form.inc, rbpagemenu.inc, menuslookandfeel.inc
Detailed Description
The purpose of this document is to support management activities on the web site's interests. The default display provides a listing of all interests available and buttons which trigger edit, create, remove and maintain bulletin board activities. Throughout all activities the driving variable is named interestGroup. This variable is of type Interest and , like above for the aMember variable, is created at the start of each iteration of the web page; created from a variable passed by the prior web page: rb$params.ID. Just like the member management web page, each activity is supported by the 'form.inc' functionality allowing activities to be defined and 'called' as required.
Edit and Change Group
These two activities support the display and edit of interest details. The interestGroup object attributes are displayed in text boxes ready for modification. Once modified, the revised attribute 'set' is then sent to the change group activity (new iteration) that uses these attributes in a save on the database. One very important aspect of this activity is the answer to the question: If this is a new iteration of the web page code, how can the same call to return a stored interest group from the database be used to provide a variable which is already modified by the prior web page parameters? This is achieved because the code below will initially return the interest group from the database but also overwrite what is returned with any additional parameters provided by the call.
rb$params.ID  = interestId;
interestGroup = new Interest(rb$params);
Create, do_create
These two activities combined display a blank form to allow input for a new interest group's details, then create a new the interest group. The first activity is a straightforward form having create and cancel buttons. The second activity takes in the new parameters and uses this to shape the new interestGroup before creating it. The common interestGroup variable supporting all web page activities is, in this case, overwritten.
interestGroup = new Interest(rb$params);
interestGroup.ID  = -1;
interestId = interestGroup.create();
if (interestId<=0) {
               // Name is invalid!
               rb$message = 'The Unique Name is already in use!';
               rb$command ='create';
......
The create Interest method call will return an error here if the unique name (uName) supplied by the rb$params already exists. Alternatively it could have been checked for in the new method call that would have returned a database object if the uName already existed.
Remove and do-remove
The purpose of these activities is to first display confirmation that the administrator actually wants to delete the interest group and then to carry out the delete. The confirmation activity also checks to see if any members are attached to that interest group and displays a warning message. The code which supports the delete is the Interest method interestGroup.remove();
Questionnaire Management
Dependances
Web page files: createQuestionnaire.rhtm, testQuestionnaire.rhtm
Include files: member.js, qaBuilder.js, qaRunner.js
Detailed Description
This web page is split into 3 parts. The first lists all the questionnaires available and allows the administrator to create, copy, remove, test or make live a questionnaire. The remove action will delete the questionnaire from the database and then relist the remaining questionnaires. if test was selected then a separate web page will be called simply displaying all the questions on one web page (testQuestionnaire.rhtm). This page will then offer a hypertext link back to the prior listing. Finally, if copy or create are selected then a new questionnaire will be created and the second part of the web page will be utilized. Here this part will prompt the administrator for a question and an answer type; the third part of the web page will ask for any additional answer type information eg a selection list.
Questionnaires can be closed or left unfinished. Once closed a questionnaire cannot be reopened and edited. An unfinished questionnaire may not be used as the site questionnaire. In the circumstance of a closed questionnaire needing to be reopened comes about, then it must be copied. The reasons for this is that answers provided for a questionnaire must always coincide with a questionnaire; any modifications to a closed questionnaire will corrupt this. The whole area of questionnaire management is described by this tutorial.
Site Data - Managing Questionnaire Answers
Dependances
Web page files:manageAnswers.rhtm, dlAnswers.rhtm
Include files: member.js, qaDumper.js
Detailed Description
The purpose of this web page is to list all the current site's questionnaires and to view or download their answer sets. This page has two parts. The first part is the questionnaire listing - very similar to the createQuestionnaire layout. This listing also shows the number of answers per questionnaire by collating and counting all the members who have answers at the start. This value is then pulled back for every questionnaire by using the following findAnswers function
function findAnswers(qFileID){
	if (answerList[qFileID] != null)
		return(answerList[qFileID].length);
	else
	   	return(0);
}
The second part of the questionnaire displays answers for perusal. This utilises the collating carried out above but instead of simply displaying a count of the answers, it displays them instead. The file dlAnswers.rhtm is used to allow data download. It is similar of the second part of the prior form but instead of displaying the answers, they are output to a file for download. This is achived by outputting to a web page then changing the web page mime which forces the browser to display a download box. The rb.page.writeraw command is used here to ensure that no other output is displayed. Futher information regarding questionnaire management is described by this tutorial.
Bulletin Board Management
Dependances
Web page files: newsadmin.rhtm
Include files: member.js, message.js, interest.js, rbpagemenu.inc, menuslookandfeel.inc
Detailed Description
This web page aims to allow the administrator to create or delete a bulletin board. A bulletin board cannot be modified as in the case of a document. If desired, this page creates a link to a bulletin board's postings. The whole area of news group management is described by this tutorial.