| Site Map | |
| Home | |
| Application Guide | |
| Reference | |
| Community | |
| Contact Whitebeam | |
| To-Do | |
| Download | |
| Credits | |
| Licence | |
| Whitebeam Users | |
 |
|
Site Management Application
Partner DashboardOverviewThe Partner Dashboard provides the interface for creation and ongoing management of Client sites by Partners. This includes the following operations:
Getting StartedRequirementsIn order to access the dashboard you will require:
Accessing the ApplicationOn registration as a Redbourne integration partner, you will be provided with client management accounts for all of your employees who need access to dashboard to manage client sites. To enter the application go to the dashboard URL (either via links from the Redbourne Partner Area, or direct to it's URL: https://www.redbourne.net/dashboard/) You will be presented with a dialog box by your browser into which you must enter the supplied username and password:
If you experience problems at this point, please call Redbourne to verify the username and password which has been allocated to you. Using the ApplicationNavigating AroundThe application consists of a number of forms and information pages, each of which has the familiar Redbourne navigation sidebar.
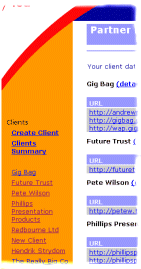
From this screen, the only navigation options are to create a new client, or select one of the detailed information screens for a specific client: Clicking on "Create Client" goes to the client registration screen, clicking on "Clients Summary" brings you back to the initial screen from any part of the application. Individual client detail screens are selected either by selecting the named link on the navigation bar, or clicking the (detail) link after the client name in the summary listing. Clicking on the URL links under a client takes you directly to
that URL, and clicking on the status link after the URL goes directly to the
URL Management screen for that client. Once within one of the above client screens, the navigation bar changes, adding a further group to the top of the bar, and changing the label above the clients list to "Other Clients". The new group has the selected client as it's title and contains direct links to the client detail, upload manager and URL management screens for that client.
Registering a New ClientIn order to create a new client, simply select "Create Client" in the navigation bar from any part of the application, fill in at least all of the required fields in the client registration screen and click the "Create Button". Once the client has been created, you may go to the domain registration screen to register new domains for use by the client. Whilst this operation can be performed at any time, we recommend that you do this before starting development to ensure that it is available when you are ready to go live with the client application. If you wish to transfer domains from other providers, or perform more complex operations such as using the Redbourne service under a sub-domain of a parent company, then at present this must be done as a manual operation by Redbourne support - please call for advice. Testing the ApplicationTo test a new application, it is necessary to enable FTP upload access to the client test area, and enable client testing. From the navigation bar or initial screen, select a client, then select "Upload" from either the navigation bar or the link in the sites section to go to the client upload manager screen. Set an FTP password by entering the same password into the two password input fields for confirmation, then click "Change Password". Next, enable application testing by clicking the Test Site "enabled" radio button. Your test implementation can then be developed by uploading successive test versions to the Redbourne FTP server. The following information should be entered into your development tool, or FTP client:
Going Live
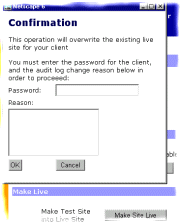
First, check that all of the required domains and URLs have been registered and set up for the client in the URL Management screen, then go to the client upload manager. In the upload manager screen, click the "Make Live" button. Because the make live function potentially changes the operation of the client's live site, you will be prompted for confirmation before proceeding. This takes the form of the client password that was entered when they were originally registered (which can be changed via the client contact form if lost). In the confirmation box, the "Reason" field allows entry of a descriptive message which will be recorded in the audit log along with the transaction record. After going live with the application, it is good practice to disable the test site, assuming testing is complete. Using the Dashboard in Customer SupportBecause the client detail screen contains details of all the major Redbourne system parameters for a client, it is a good starting point for day to day customer support operations. At a glance, it gives key customer contact information, URL details, as well as an audit log of all operations you have performed on the site recently. Application ReferenceClient Detail ScreenThis screen gives information for a single client, in four areas. Contact InformationThis area is at the top of the screen, and provides basic contact information for the client: Modify Contact InformationThis is a link which goes to the client contact screen where client information (including passwords or notes) can be modified. Account InformationCreatedThe date and time at which the client was first registered with Redbourne. Application first live dateThe date and time at which the first live site (as distinct from non-production test site) for the client was enabled. Typically full billing for client site commences on this date. Billing AmountThe billing level currently being applied for the client SitesProvides a list of URLs being served for this client. The left column contains live, production sites. The right column shows the test URL for this client. Note that presence of a site in this list only shows that it has been set up, it doesn't indicate that the site is currently active. Site UploadLink to upload manager screen. Manage Domains & URLsLink to URL Management screen to allow domains to be modified. Audit LogThis area shows the last 10 configuration events which have occurred for this client. Full Log (chronological order)This link invokes a new window with a full listing of all operations performed on this client's application (limited to the last 250 messages). The listing is in chronological order, most recent last. Full Log (reverse order)This link invokes a new window with a full listing of all operations performed on this client's application (limited to the last 250 messages). The listing is in the same, most recent first, order as the summary listing. Summary Audit Log TableThe columns in the table contain the following data
Client Creation/Modification ScreenThis screen allows the creation of clients and, subsequently, the modification of client information, including passwords. Input fields and controls are listed below, the following fields are mandatory:
Client NameThe full legal name of the company. It is important that this correctly reflects the name of the legal entity of the client, as it is used as the name of the registrant of any domain names created for this client. Any error could result in future ownership problems for domain names registered which can be very difficult to resolve. Co NumberThe company number for Limited Companies or PLCs which are incorporated in England, Scotland, Wales or Northern Ireland. This field must be non-empty, and must be a valid company number in the above circumstances, otherwise problems and delays may occur when registering domain names. If the client is not a UK limited company (e.g. sole trader), then it is acceptable to enter the text "n/a" in this field. If the client is a registered charity, then enter the charity number in this field, and comment on this in the notes field. Admin ContactThis is the name of an individual employed by the client who will be the legal/administrative contact for e.g. registration of domain names. Client IDThis is a short name, chosen by the partner, to represent the client. This data entry field is only available for client creation, once created, it will appear as a read only field on the modify screen. It must be less than 20 characters, and consist of only lower case letters, numbers, and the hyphen character. It must start with a letter or number. This name is unique on the Redbourne system, and may not clash with the name of any other client or login, regardless of partner. Your fist choice of client ID may therefore be rejected, and the use of a mixture of letters and numbers is encouraged if necessary in order to arrive at a unique ID. AddressUp to four lines of address (excluding Country and Post Code, entered separately) Post CodePost or ZIP code. |


 The
initial screen presents general information, including a summary listing of
each of your clients.
 Once the application
has been thoroughly tested and approved by the client, it can be moved into
production.